

The most powerful cartography tool for Mac.
Installation
Introduction to MacMap® version 3
The Software
MacMap®
Plug-ins and Frameworks
Utilities
Help and Language
Parameters XML
The MacMap® Log
Software Protection
Presentation of MacMap®
Main Windows and Menus
MacMap®v3 Databases
Projects, Types and Objects
Object Status
Simple Tasks using the EEC Demo Database
Opening the Database
Tool Box
Presentation Box
Visualising an Object File
Requesting information from the Database
Requesting geographic information
Closing a Database
Installation
After either downloading the programme or inserting your CD, you should have a disk image called "MacMapxxx", where the xxx is the version number (MacMap®321 for example, for MacMap® version 3.2, release 1). Double click on the image to go to the following window:
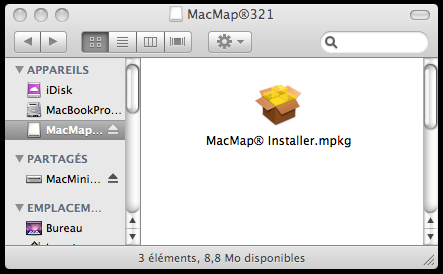
Then double-click on the "MacMap® Installer" icon to run the "Programme Installation" tool.
Once installed run MacMap®. When starting MacMap® for the first time enter the Serial Number.
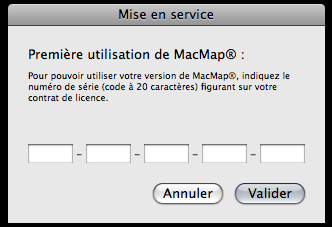
The Serial Number is provided on the last page of the Licence Agreement. Enter the number making sure to use the right case. The serial number can be copied and pasted into the text zone. If you have a full licence with a copy protection dongle, please insert the key before running MacMap®.
!! : Administrator authorisation is needed to install MacMap®. A Password is needed to proceed with installation. Run MacMap® for the first time from an Administrator Account. This gives the programme an identification number.
Introduction to MacMap® version 3
The Software
MacMap®
MacMap® is a GIS/Cartographer software programme based on a core with added external "plug-in" functions. MacMap® also uses dynamic libraries called "Frameworks" in the Mac environment. These libraries can be used by external programmes to access MacMap®v3 table content.
Plug-ins and Frameworks
The plug-ins are grouped into different families, corresponding to specific functions. Plug-ins are managed using standard Macintosh functions (Command-i on Application, "External Modules").
- Tools: Used to manipulate objects and navigate in the cartographic window. Accessed in "Tool Box".
- XMaps: Generic functions with no particular application (ex: Selecting Objects, Spreadsheets, ...)
- Geogs: Geographic search modules, can be integrated into database requests (ex: selecting objects less than a certain distance from a particular object, finding points in a polygon, ...)
- Calcs: Calculations which provide a result/response for a given object (ex: length of a line, object identification, ...). Use "Formula Editor" to compile and define Calcs.
- Constants: Calculation functions which provide a constant result, for example the value of "Pi" or "e". Use "Constant Editor" to compile and define Constants.
- vDefs: Defines the cartographic representation (style) of an object: a surface may be displayed as a coloured polygon, or the line defining its contour, or by a point (ex: barycentre) or a collection of points, or by text (ex: the name of the polygon) ... Access vDefs in the "Presentation Box". Styles are part of the "Views" collection, defining the database's cartographic representation.
Main Frameworks are installed in the system's "Library/Frameworks" folder.
- MacMapSuite is a collection of utilities to manage database access.
- MacMapStats groups together all statistical functions.
- MacMapGeocoder groups together all geocoding functions.
- MacMapRoute groups together all itinerary calculation functions.
Other Frameworks may subsequently be installed in the same folder, as MacMap® grows and develops.
Utilities
Specific tasks management applications: Geocodage, Itinerary Calculation, Transcoding, etc... Using the Frameworks installed by MacMap® to read and/or write data in MacMap®v3 format.
Help and Language
The version 3 of MacMap® includes an HTML help tool compatible with the Apple™ utility "Visualising Help". Access interactive assistance at any time to help with searches and requests. Access via the MacMap® "Help" menu.
MacMap®v3 also includes a localisation function in 3 languages (French, English and Italian) for all interface elements, including the Help function. Presentations can be made in different languages, within the same software version, using the system's standard tools (Command-i application, under "Languages").
XML Parameters
All of the MacMap® functions use parameters written in XML format (Views, Styles, Hyphens, various preferences). This permits certain changes to be made to functions by simply using the text mode. You can then go further than permitted with the graphic interface. For example duplicationg a Style from one Type to another, of a Calc from one Database to another.
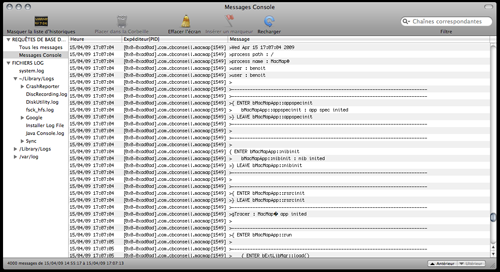
The MacMap® Log
MacMap® leaves a trace of the different operations executed (Error Message, Various Messages). These traces are accessed using the "Console" utility in your Mac's "Aplications/Utilities" Folder.
Software Protection
MacMap® is protected by a physical, numbered USB key (the "Dongle") corresponding to the Serial Number provided with the Licence Agreement.
If the Dongle is removed while the programme is running, the programme will immediately stop working.
The software runs only in "Viewer" mode if it is started without the Dongle plugged in.
Presentation of MacMap®
Main Windows and Menus
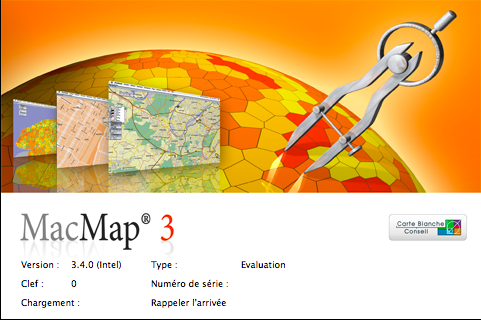
Run the MacMap® programme. While the programme is booting-up, the Welcome Screen provides details concerning your version of MacMap® (Dongle Number, Serial Number, Version Type, etc..) The names of the Plug-Ins being opened are shown in turn at the bottom of the window.
When the programme is open the "Minisheet" window appears underneath the Menu bar. This window provides information on the Applications being used: it works like the "Status-Bar" on an Internet Navigator.

The Main Menus are:
- File: contains the main functions (New, Open, Close, Print, and the Import/Export functions)
- Data: access to all the Database Management functions.
- Search: access to the Search functions (alphanumeric and/or geographic requests).
- Page: includes all Main Window navigation functions.
- Pallet: opens pallets containing various Tools.
MacMap®v3 Databases
MacMap® Databases are structured in different gender "Types": "textual", "point", "linear", "surface", and "raster". MacMap® databases include a ".mmproject" file and ".type" files. The ".mmproject" file contains the references to the ".type" files in the Database. For each Type there is a corresponding ".type" file.
Projects, Types and Objects
Projects and Types are independent of one another. It is possible, therefore, to share a particular Type between several Databases. Type references are described by the relevant access path of the main Database file (ex: ".proj"). It is important, therefore, not to move elements of one relative to the others, nor to re-name access path content files.
"Types" are collections of Objects which have a common Database structure (ie: Fields). MacMap® creates 5 standards Fields for each "Type".
- Name: Characters Field.
- Sub-Type: Class Field, defining a basic typology.
- Colour: Class Field with 8 modes, used by default Styles.
- Direction: Class Field with 3 modes, to create directional graphs.
- Geometry: Fields containing Object's geographic coordinates.
User Fields can be added for each Type.
Each Object created in MacMap® belongs to a specific Type.
Object Status
Objects inputted in MacMap® can have different Statuses during a working session:
- Selected: a selected Object appears inside a black line rectangle. Various MacMap® functions work based on the Selection. A Selection can include objects with different Types.
- Contrasted : an extra Selection level Generally obtained by Selecting an Object then using the "Contrast Selection" Function in the "Search" Menu. This extra Selection level is less volatile, for example it cannot be modified by the Selection Tool. Contrasts are normally used to make cross operations between 2 lists of Objects (Selected and Contrasted). Contrasted Objects appear inside a thick grey lined rectangle.
- Masked: Objects can be Masked only by using the "Mask" and "Only Display This" Functions in the "Page" Menu. A Masked Object is temporarily removed from the MacMap® Index. It does not, therefore, appear on the Screen and the Functions no longer have access to these Objects (unless specifically mentioned). To find the normal Status of a Masked Object, use either the "Show All" Function in the "Page" Menu, or activate the Option "Include Masked Objects" in the Selection Function.
Simple Tasks using the EEC Demo Database
Please download the EEC Demo from the web site http://www.macmap.com, and save to your hard disk.
Opening the Database
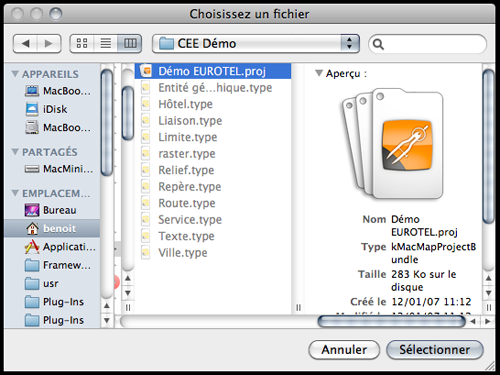
Use the "File->Open" command to open the EEC Demo Database,
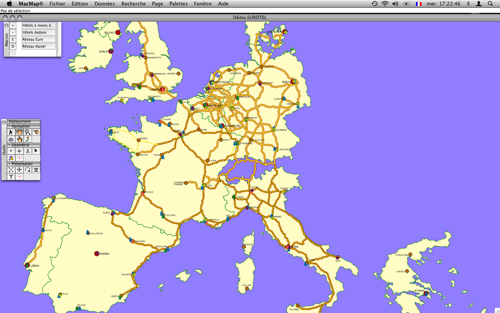
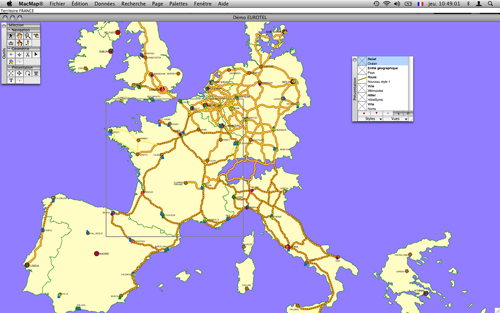
After validating the Open box, the following document should be displayed:
!! : MacMap® only opens one document at a time.
Tool Box
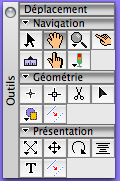
If the "Tool Box" is not visible, open it from the "Pallets" Menu. Tools are organised in three categories: navigation, changing object geometry, changing graphic forms. Before starting, get familiar with the Navigation Tools. Some Tools can be configured by double-clicking on their icon, with others, click-and-hold to access a pop-up Menu. The Zoom Tool (magnifying glass) has both Functions.
Presentation Box
Open the "Presentation Box". This Box is used to display different Layers (called "Styles" in MacMap®) and organise the display as required. MacMap® can display the same Layer as many times as is necessary: for example displaying a Layer of polygons as coloured surfaces, or as a net to show the outline, or as an icon symbolising the centre of the surface, or as text providing the name of the surface. In the following example, note that the "Town" Type is represented two times: first with the Style "Metropoles" as an icon, then with the Style "Noms" in Text form taken from a Field in the Database.
In the main part of the Window, the Styles are displayed in rectangles with three pieces of information: A square on the right provides a preview of the; Mode Style and the current level; the relevant Type in bold characters: the Style Name.
These elements permit the following actions:
- To move a Style, use the box on the left to drag it up or down.
- Click-and-hold on the Name of the Type associated with the Style to choose the Style Mode (ex: one of the classes, such as the Sub-Type).
- Click-and-hold on the Name of the Type associated with the Style to centre the screen on the Zone covered by the Type.
- Click-and-hold on the Style's Name to access the list of Styles available for the associated Type, to change the Style or create a new Style.
- Double-click on the Name of the Style to open the Editor associated with the Style. The Style Name can then be changed.
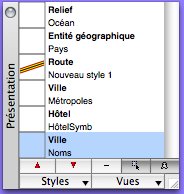
Under the principle Zone there are two rows of buttons. The first row is for manipulating the Styles.
- The buttons
 and
and  are used to move the selected Styles up or down in the list.
 - The
 button is used to remove the selected Style from the list.
 - The
 button is used to make the selected Style non-selectionable or selectionable: this means that Objects represented by this Style cannot be manipulated by using the mouse.
 - The
 button is used to Mask or re-display the selected Style, so as not to display a Style temporarily.
The second line is used to access Style and Type Management.
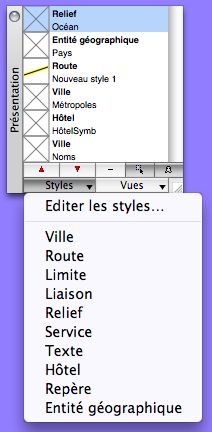
| The "Styles" button is used to access the Styles. The first command in the Menu opens the Style Management Tool: used to remove, duplicate, re-name or create Styles. The list of Types used in the Database is displayed. Choose a command to add a Style to the Presentation Box. |
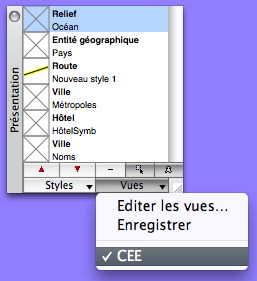
| The second button "Views" is used to access different Views of your document. A View is a collection of saved Styles. The command "Edit Views" is used to access the View Management Tool : used to remove, duplicate, re-name or create new views. The second command "Save" is used to save changes made to a View. When the Database is closed, or the Presentation Window is closed or when changing a View, MacMap® asks if you want to Save the changes made to the present View. The list of Views of your document is then displayed. In this instance there is only 1 View. CEE. |
Visualising Object data
Select the first Tool ("Selection") in the Tool Box.  .
.
Double-click on one of the Objects represented on the map: a new window opens with the "Sheet" showing the different attributes/parameters of the Object.
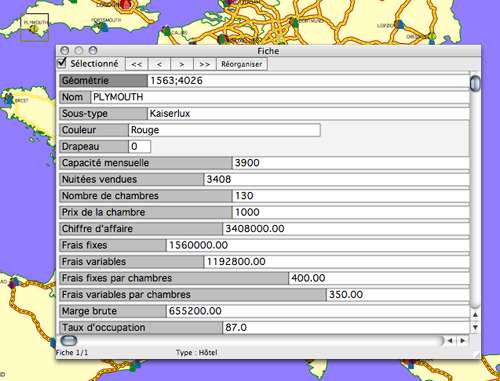
The Sheet can also be accessed in the "Pallets" Menu. Close the Sheet. On the Map, select several Objects by dragging with the mouse, or by clicking on several Objects keeping the Shift Key down, then open the Sheet again (Command-Enter). You will notice that you can consult the data of different objects by displaying them by using the "<", "<<", ">", and ">>" buttons. Close the Sheet. Tick the box "Selected" to change the Status of an Object.
The Sheet Fields can also be moved by clicking on the Field Name keeping the "Alt" key down. To return to the original Sheet Status click on the button "Reorganise".
Changes made to the Sheet may also change the Map if the modified field is used in a Style. In this example, changing the selected Object Name ("PLYMOUT") will update the Map as the Name is displayed.
Close the Sheet.
Requesting Information from the Database
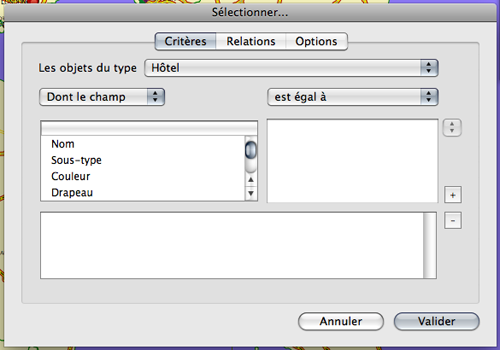
For this example we will make a request which will allow us to select "Eurofamily" chain "Hotel" Type Objects.
Click "Select" in the "Search" Menu.
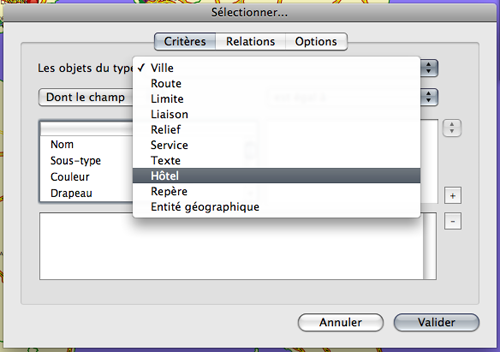
Choose "Hotel" from the "Object Type" heading in the Window (see above).
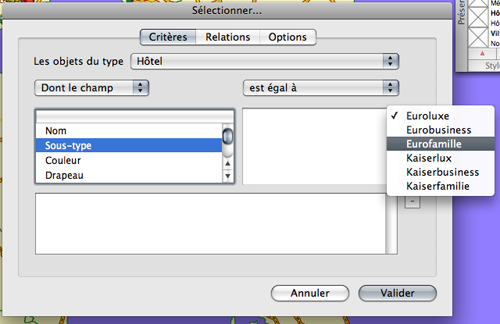
Select "Sub-type" in the "In Field" pop-up Menu list as "Hotel" families appear in this Field. Select "Eurofamily" from the pop-up Menu completely on the right of the Window. The Sub-Type number ("3") should appear in the Text Zone to the left of the pop-up Menu.
!! : The pop-up on the right of the Window is only active for Fields with data-capture constraints. The Default Fields Sub-Type, Colour, Direction/Flag have data-capture constraints. User Fields can also be associated to data-capture constraints.
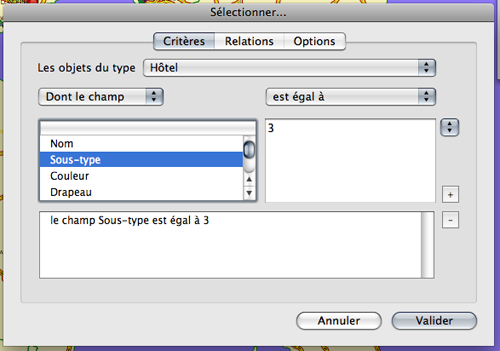
Click on the "+" button to add this condition to your request.
After confirming, you should obtain the following result: the Minisheet should indicate that 37 "Hotel" Type Objects correspond to your request. These 37 Objects were Selected and are now shown surrounded by a black rectangle.
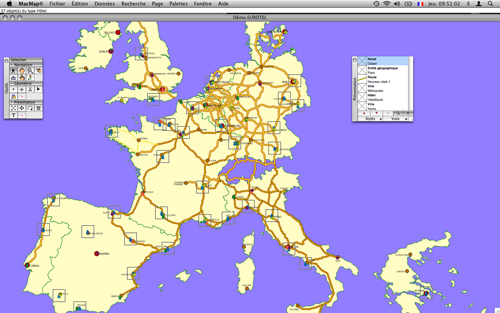
!! : Centre the screen on each Object Selected by using the Functions "Centre on next" and "Centre on previous" in the "Page" Menu.
See the results of your request in spreadsheet form by using the "Spreadsheet" command in the "Pallets" Menu (or Command-b).
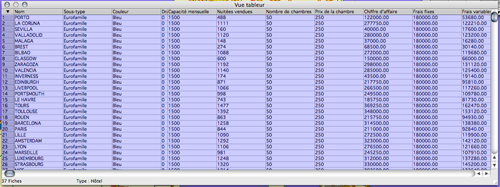
As with the Sheet, the Spreadsheet works interactively with the Map.
- Click on a Line Heading to change the Selection.
- Double-click on a Line Heading to open the Objects Sheet.
- Click on a value, you can then change it (in text mode, pop-up)
Similarly any changes made to the Map are automatically translated into the Spreadsheet.
Requesting Geographic Information
For this second example we will make a request which will allow us to select all "Hotel" Type Objects in France.
Use the Selection Tool, Select the Object "France" by clicking on it in the Map.
In the "Search" Menu and click on "Select", then indicate the "Hotel" type.
Click on the tab "Relations".
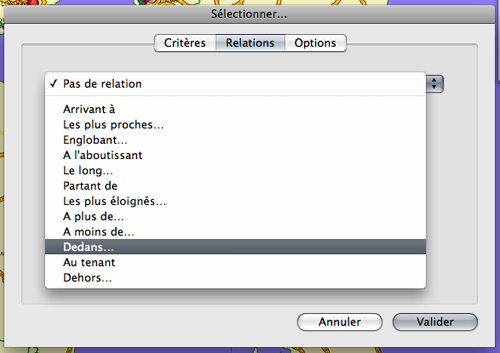
Access the available "Geogs" in the pop-up Menu at the top of the screen. Choose "Inside":
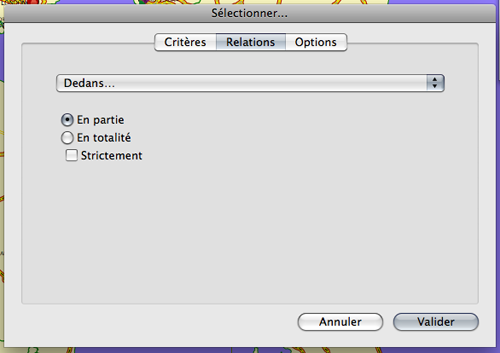
After confirming you should obtain the following result: 35 "Hotel" Type Objects are Selected.

!! : You can also make an alphanumeric Database Information request at the same time as a geographic request. (ex: hotels in the Eurofamily chain in France)
Closing a Database
To close a MacMap® Database, use the command "Close" in the "File" Menu or "Quit" if you have finished a work session.
!! : Changes are automatically saved in MacMap® . Because of this there are no "Save" of "Save As" commands.